
Greysen Presents ‘Shop Your Brushes!
By: Greysen Walsh
Photoshop is a pillar of art school. Most majors use Photoshop at some point in their work pipeline, whether it be for digital painting, photo manipulation, or 3D rendering (which it has surprisingly!). One of the most important parts of Photoshop is its extensive brush manipulation. Learning how to build and change brushes has allowed my art to feel more controlled and helped me to understand how certain brushes function. Today, we’ll be taking a look at how to build and manipulate your own brush. So strap in as we begin our look into Photoshop brushes!
To begin, you need to create your brush. This can be achieved by taking a photo of what you want in black and white, then exporting it in. You can also paint your own design. Keep in mind that the image needs to be transparent so that the color only lands where the brush silhouette is in black. So, if you have a background, be sure to delete it before beginning the creation process.

The next step is to hit Edit in the top left corner and go down to “Define Brush Preset…” You will be able to edit the name and then your brush is created!


THESE TWO above IMAGES ARE SIDE BY SIDE

This is the easy part and you can leave it at that if you’re satisfied with your brush. However, if you want to learn the in’s and out’s of the Brush Settings, please keep reading!
The Brush Settings are where you go to really dig in deep on how your brush reacts. Brush Settings starts out on Brush Tip Shape. Here you can switch between brushes and change the default size, angle, roundness, or spacing between each individual illustration of the brush preset.

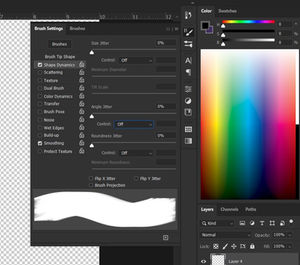
The next tab is Shape Dynamics, which gets into the body of the brush. Jittering is mentioned a few times later on as well, and it means an added variation of different types between each illustration of the brush preset. In this case, you can add a size jitter, an angle jitter, and a roundness jitter. Each of these can be controlled by different factors, whether that be by fading as the brush moves, a dial on the tablet, or the tilt or pressure of your stylus.
The next tab is Scattering, which is best for splatter-type brushes. It creates a more dramatic variation in the placement and size than can be achieved in the Shape Dynamics tab. This is best used for brushes that simulate spray paint or airbrushing.

Texture can be used to add a bit more body in your brush. Photoshop has preset filters that can be overlayed on your brush to create a dimensional aspect, but you can import your own which is a process similar to the brush creation.

The next tab is a little more complicated. Dual Brush is the ability to add another brush on top of yours to add more variety. In this case, I added in Kyle T. Webster’s Border 2 brush on top of the HoneyDripper demo brush. This can also be used to add a texture brush on top of a shaped brush or vice versa.

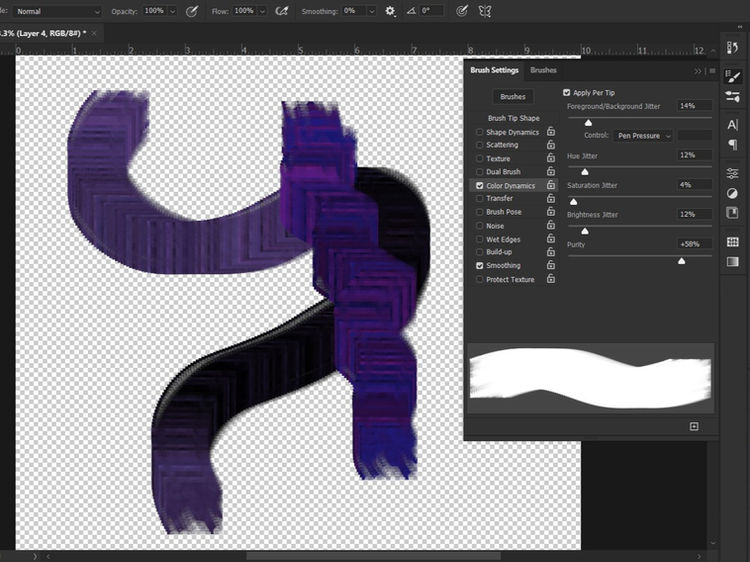
Color Dynamics is the next tab and one of my favorites. To use Color Dynamics, select a foreground and background color in your color wheel tab that you want to mix to create a messy, blended mix between the two colors. This can be controlled via fade, direction, or your stylus manipulation. There is also the ability to add in a jitter with hue, brightness, saturation, and purity. In the demo, I was using pen pressure to fade the black into the purple as well as a hue and purity jitter on the right.
Transfer is interesting in that it simulates watercolor and other layering painting styles. Transfer still holds the texture of the original brush preset while still adding in that flow and opacity look.

The next tab is highly specific. Brush Pose allows the user to override a tablet stylus’ natural variation in the brush. This creates a very mouse and trackpad look. You can see with the smaller lines used below that I overrode the pressure so that the lightest size variation was only allowed instead of the thicker version.

From here we get into non-editable brush settings.
Noise adds in extra noise in the original brush preset. You can see below the difference between the original and the edited brush preset. Unfortunately, the noise level is not editable.

Wet Edges is similar to the Transfer setting but voids a lot of the texture in a brush. It adds an opacity difference and a darker outer edge to simulate a dried spot of watercolor. Anything drawn on top of a single shape is multiplied and darkened.

Build Up is best for an airbrush effect, similar to Scattering but with a softer edge. As a note, you must use Transfer in order to get the soft effect, or else Build Up will not affect your brush.

Protect Texture is also fairly self-explanatory as it keeps all brushes with a defined texture from losing that texture through further manipulation. This is best used to simulate a painted canvas effect.


Congratulations, you made it through the Brush Settings explanation! I highly recommend making a brush out of this explanation to fully learn the complexities of this tool. From there, be sure to save your brushes by exporting them to a safe digital location, like a flash drive, Google Drive, or Dropbox. You can export brushes by clicking on the three lines at the top corner of the Brushes tab and then clicking “Export Selected Brushes…”
A great resource to find brushes to build upon and change is the adobe website itself, https://www.adobe.com/products/photoshop/brushes.html. Here, Kyle T. Webster’s library of extensive brushes are available to Adobe Photoshop and Adobe Suite subscribers which includes current SCAD students.
I hope this tutorial was enlightening as extensive as it was. My favorite brushes are often the ones that I’ve learned how to change to better fit my needs and create the image that I want to see. However, I’ve realized as I’ve delved into this that it isn’t the brush that creates the art, it’s the artist! Find the few brushes that work best for you, that you know in and out, and enjoy what you create. There’s a world full of brushes out there, and now you are ready to tackle any project thrown your way!

February Drawing Prompt: Worst. Match. EVER!!
What is Natural Dye?